
How to Estimate Electrical Work: A Step-by-Step Guide
A homeowner wants their new office wired: eight receptacles, four ceiling lights, two dimmer switches, and a dedicated circuit. You count the devices, price the material, figure three days for a two-person crew, and send the quote.
Then you start pulling cable. There’s blocking where you didn’t expect it. The home run is longer than you measured. The crew needs another eight worker-hours to finish.
The material list was fine. The hours weren’t.
To estimate electrical work, complete a material takeoff, calculate labor hours for rough-in and trim, add job costs and overhead, then set a price that covers your target profit. The drawings give you the quantities. A site visit and your crew’s production history help determine the hours.
Electrical Estimating at a Glance
For a small home office renovation, the estimate might look like this:
| Cost category | Amount |
|---|---|
| Electrical materials | $1,800 |
| Labor: 48 worker-hours | $2,160 |
| Equipment and other direct expenses | $140 |
| Permit and inspection allowance | $200 |
| Total direct costs | $4,300 |
| Allocated overhead | $600 |
| Contingency | $300 |
| Total estimated job cost | $5,200 |
| Target profit margin | 20% |
| Selling price | $6,500 |
Every number in this example is made up to show the math. Use your own supplier prices, site measurements, labor history, and loaded rates when pricing real jobs.
The selling price comes from:
Selling price = Estimated job cost ÷ (1 − Target profit margin)
$5,200 ÷ 0.80 = $6,500
That leaves $1,300 in expected profit after the costs included in the estimate.
How to Estimate Electrical Work in 8 Steps
Step 1: Review the Drawings and Define the Scope
Start with the plans and a site visit.
Count what’s being installed, check what’s coming out, and look at the conditions your crew will be working in.
For residential work, check the receptacle and switch locations, lighting layout, proposed circuits, panel location, and cable routes. Find out whether the framing will be exposed or your crew will be fishing cable through finished walls.
Walk the space if you can. Look for insulated exterior walls, blocking, tight attic access, occupied rooms, and other trades working in the same area.
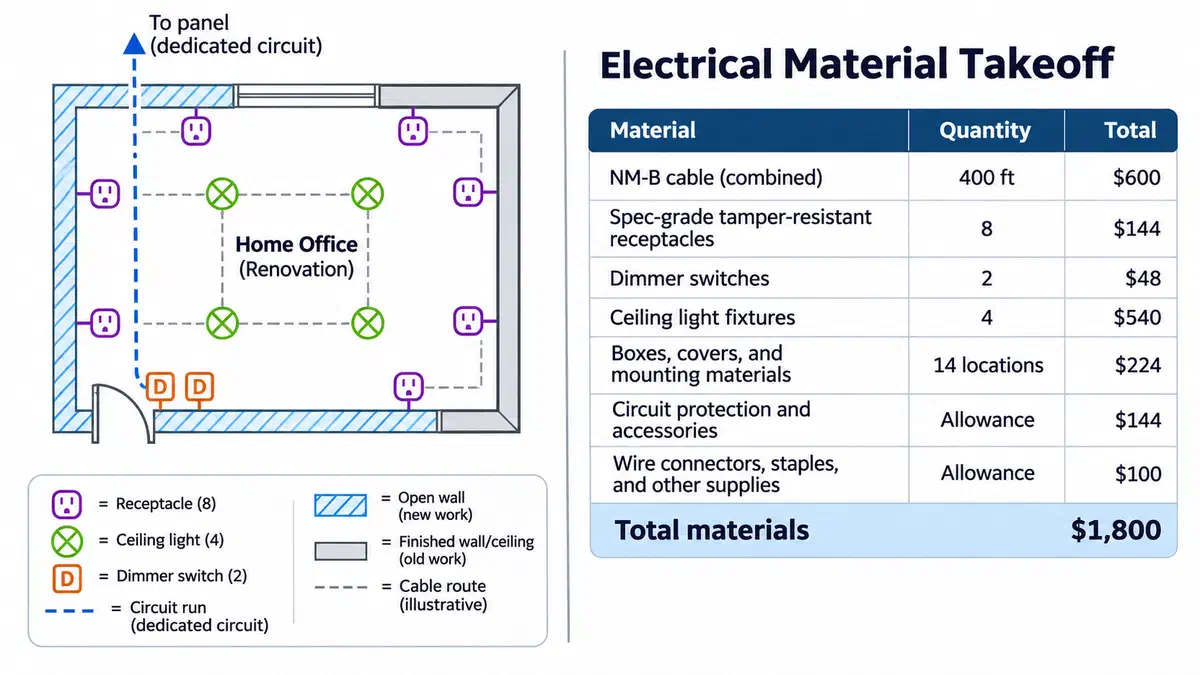
For our home office, the ceiling and two walls are finished. The other two walls are open from a window replacement. The contractor will use new-work boxes where the framing is exposed and old-work boxes where existing finishes must remain.
The scope includes:
- Eight receptacle locations
- Four ceiling light fixtures
- Two dimmer switches
- One dedicated circuit
- Associated wiring, boxes, and fittings
- Testing, labeling, and cleanup
The contractor has assessed the existing panel and established the proposed scope. Panel replacement and finished-wall repairs are excluded.
Write down those exclusions. A quote can go sideways when the homeowner assumes it includes drywall patching and painting.
If the drawings leave something unclear, get an answer before you price it. For a renovation, also document what you’ll do if hidden conditions require additional work.
Step 2: Complete the Electrical Material Takeoff
An electrical takeoff turns the plans and site measurements into a list you can price and order.
Start by counting devices, fixtures, and boxes. Then measure cable and conduit routes, including home runs.
A residential electrical takeoff commonly includes:
| Material | What to check |
|---|---|
| Receptacles | Quantity, type, and specified protection |
| Switches and dimmers | Quantity, type, and switching arrangement |
| Light fixtures | Fixture type, mounting, and accessories |
| Boxes and covers | New-work or old-work, box type, and location |
| NM-B cable | Cable types and route lengths |
| Conduit and fittings | Required raceways, bends, and connectors |
| Breakers and protective devices | Specified circuit protection |
| Miscellaneous supplies | Wire connectors, staples, bushings, fasteners, and labels |
A dedicated 20-amp circuit might be designed with 12/2 NM-B cable, for example. The material list could also include old-work boxes, a specified AFCI or GFCI protective device, wire connectors, and fittings.
Use the actual design and local code requirements to choose the wire size, breaker type, boxes, and protection. Your takeoff needs to reflect what’s going to be installed.
Measure Cable Runs
Trace the proposed paths between devices and back to the panel. Include horizontal runs, vertical drops, obstacles, and termination allowances.
A receptacle that’s 20 feet from the panel might need a much longer cable run once you’ve followed the framing.
Measure the runs by cable or conductor type. Keep track of the quantity needed for the installation and the amount you’ll purchase.
If your takeoff calls for several cable types totaling 365 feet, you might budget for 400 feet to allow for packaging, cutting, and waste. Record the allowance so you can compare it with actual usage later.
Old Work vs. New Work
Exposed framing usually gives the crew room to drill, route cable, and set boxes. Finished walls add time for fishing wire, working around insulation and blocking, and protecting the customer’s property.
Our home office has both conditions. The open walls should allow faster rough-in, while the finished walls and ceiling require more careful routing.
Say a rough-in task takes eight worker-hours under normal access conditions. After checking the finished walls, you estimate 12 hours.
8 hours × 1.5 = 12 worker-hours
Apply the adjustment to the affected work. A difficult cable route doesn’t automatically make every device or fixture take 50% longer.
Keep separate labor records for new-work and old-work jobs. They’re useful when you price the next renovation.
Step 3: Price the Materials
Get current costs from your supply house once the takeoff is complete.
Common stock items may already be in your price list. Check current quotes for wire, fixtures, and any equipment that could make a noticeable difference to the bid.
The home office material worksheet looks like this:
| Material | Quantity | Unit cost | Total |
|---|---|---|---|
| NM-B cable, combined purchasing quantities | 400 ft | $1.50 | $600 |
| Spec-grade tamper-resistant receptacles | 8 | $18 | $144 |
| Dimmer switches | 2 | $24 | $48 |
| Ceiling light fixtures | 4 | $135 | $540 |
| Boxes, covers, and mounting materials | 14 locations | $16 | $224 |
| Circuit protection and connection accessories | Allowance | $144 | $144 |
| Wire connectors, staples, and other supplies | Allowance | $100 | $100 |
| Total materials | $1,800 |
For a working bid, specify the products well enough to get an accurate price. Standard receptacles, spec-grade devices, GFCI receptacles, dimmers, and specialty fixtures can have very different costs.
Check Wire Prices and Quote Validity
Copper prices affect electrical wire costs. A wire price from an old estimate may leave you short when you place the order.
For larger material purchases, ask your supply house how long the quoted price will hold. Find out whether you can reserve or purchase the material at that price.
Set a customer quote expiration date that fits your supplier terms and project schedule. Fifteen or thirty days may work for some jobs; use a shorter period when your material pricing requires it.
Also check delivery charges, purchasing taxes, and any special-order items before completing the material total.
Step 4: Estimate Electrical Labor Hours
Labor estimating starts with quantities, installation conditions, and how your crew works.
One method uses labor units: the expected worker-hours needed to install a measured quantity.
Worker-hours = Quantity × Labor hours per unit
If your records show that a particular device installation takes 0.75 worker-hours under normal conditions, eight installations would take:
8 × 0.75 = 6 worker-hours
Check the work covered by the unit before adding more hours for installation, handling, or setup.
Using NECA Labor Units
The NECA Manual of Labor Units is a reference used in electrical construction estimating.
It provides labor units for normal, difficult, and very difficult installation conditions. The units include normal material handling, drawing study, measuring and layout, installation, and normal nonproductive labor. They exclude supervision.
The manual’s typical-project assumptions include a single building of up to three stories, a location near a metropolitan area, and a regular work schedule of eight hours per day and 40 hours per week. Those conditions don’t necessarily reflect a small residential renovation with occupied rooms and finished walls.
Use the units as a starting point, then adjust for the job. Your own records from comparable residential work may give you a better estimate.
On a two-person crew, the lead is usually installing while running the job, so their time is already in the labor hours. If the owner spends separate time coordinating, price it as a direct cost or cover it in overhead. Pick one. Don’t charge it twice.
Estimate Rough-In and Trim Separately
Rough-in and trim often happen on different visits.
During rough-in, the crew sets boxes, routes cable, and completes the connections appropriate to that stage. Trim generally includes installing devices, cover plates, and fixtures after the space is ready.
An inspection or another trade’s work may separate the two phases. The crew has to come back, unload tools, get set up, and finish.
For our home office, the labor estimate is:
| Work activity | Worker-hours |
|---|---|
| Rough-in | |
| Site setup and protection | 4 |
| Removal and preparation of existing work | 5 |
| Set boxes | 4 |
| Pull cable, make up grounds and splices | 17 |
| Rough-in subtotal | 30 |
| Trim | |
| Return trip: load-in and setup | 2 |
| Install devices and plates | 6 |
| Install fixtures | 5 |
| Testing, labeling, and cleanup | 5 |
| Trim subtotal | 18 |
| Total worker-hours | 48 |
With two electricians, that’s about two days on site for rough-in and one day for trim, assuming eight-hour workdays and allowing for the shorter final visit.
The visits may happen on different dates depending on the construction schedule.
Include Time Outside Installation
Supply house runs, unusual material handling, permit administration, inspection scheduling, and return visits can consume time.
Some routine work may already be included in your labor units or business overhead. Review those allowances before adding more.
For example, the sample table includes a two-worker-hour return-trip setup allowance. If the crew expects a longer trip or another visit, adjust the estimate before sending it.
Step 5: Calculate the Loaded Labor Cost
An electrician’s wage is one part of the cost of employing them.
The loaded labor rate may also include employer payroll taxes, workers’ compensation, employer-paid benefits, and other employment costs.
For this project, we’ll use $45 per worker-hour.
48 worker-hours × $45 = $2,160
If the lead and helper have different loaded rates, calculate each person’s hours separately. A weighted crew rate also works when it accurately represents who’s doing the job.
Keep paid time and productive time straight. The method you use to calculate your loaded rate should match the way you estimate hours and allocate overhead.
For a detailed labor-cost calculation, see How to Calculate Construction Labor Cost.
Step 6: Add Equipment, Permits, and Other Job Costs
Check the remaining direct expenses. Electrical jobs can involve equipment rental, delivery, disposal, specialty testing, outside services, and applicable permit or inspection fees.
For the home office estimate:
| Expense | Cost |
|---|---|
| Equipment and miscellaneous direct expenses | $140 |
| Permit and inspection allowance | $200 |
| Other direct expenses | $340 |
Confirm permit and inspection requirements and fees with the local authority for the actual job.
The direct costs now total:
| Cost | Amount |
|---|---|
| Materials | $1,800 |
| Labor | $2,160 |
| Other direct expenses | $340 |
| Total direct job costs | $4,300 |
Step 7: Add Overhead, Contingency, and Profit
Office administration, insurance, accounting, software, and other operating expenses still need to be covered.
You can allocate those costs using productive crew hours.
Calculate Overhead per Productive Hour
Suppose your annual overhead budget is $75,000 and you expect 6,000 productive worker-hours across your jobs.
$75,000 ÷ 6,000 = $12.50 overhead per productive worker-hour
For this 48-hour job:
48 × $12.50 = $600
Add the overhead allocation to direct costs:
$4,300 + $600 = $4,900
Your overhead budget should exclude costs already included in direct expenses or loaded labor rates.
Allow for Job Risks
The contractor adds a $300 contingency for the remaining uncertainty around access and cable routing.
$4,900 + $300 = $5,200 estimated job cost
If concealed conditions require additional work outside the agreed scope, document the change and follow the agreed approval process.
Calculate the Selling Price
Suppose your target profit margin is 20%.
Selling price = Estimated cost ÷ (1 − Target margin)
$5,200 ÷ 0.80 = $6,500
Expected profit:
$6,500 − $5,200 = $1,300
Profit margin:
$1,300 ÷ $6,500 = 20%
The $300 contingency is already included in the $5,200 cost basis. If the job finishes without using that allowance, the unused amount increases the profit at the agreed selling price.
Check Markup Against Margin
Adding a 20% markup to $5,200 would give you:
$5,200 × 1.20 = $6,240
That’s $1,040 in profit, or a 16.7% margin.
A 25% markup on the $5,200 cost produces the $6,500 price and 20% margin used in this example.
Our Markup vs. Margin for Contractors guide explains the difference in more detail.
Step 8: Review the Estimate and Prepare the Bid
Check the takeoff before you send the price. Compare the material quantities with the drawings, confirm the cable routes, and review the labor allowances against the conditions you saw on site.
Make sure both rough-in and trim are covered, including any return visits. Check supplier quote dates and the expected project schedule.
For the customer, keep the estimate clear:
- Contractor and customer details
- Job address
- Included electrical work and specified products
- Assumptions and exclusions
- Total price and applicable taxes
- Payment terms and schedule
- Quote expiration date
- Process for approving extra work
For our home office job, the scope could read:
Home Office Electrical Renovation: $6,500
Supply and install eight specified receptacle locations, four ceiling fixtures, two dimmer switches, and one dedicated circuit, including associated wiring, boxes, fittings, installation, testing, and cleanup.
Exclusions: Panel replacement, drywall repairs, painting, and electrical work outside the agreed scope.
Once the takeoff and pricing are complete, Cinderblock’s free contractor estimate generator can help you put together a customer-facing estimate.
Electrical Estimate Example: The Cost of Eight Extra Hours
The home office was quoted at $6,500 based on 48 worker-hours.
During rough-in, the crew finds unexpected blocking in one of the finished walls. The cable routing takes another eight worker-hours.
8 × $45 = $360 additional labor cost
With the customer price unchanged and all other costs held constant, the result is:
| Item | Original estimate | After labor overrun |
|---|---|---|
| Worker-hours | 48 | 56 |
| Labor cost | $2,160 | $2,520 |
| Total costs | $5,200 | $5,560 |
| Customer price | $6,500 | $6,500 |
| Profit | $1,300 | $940 |
| Profit margin | 20% | 14.5% |
The job lost $360 of expected profit. The margin fell by more than five percentage points.
If the same overrun keeps showing up on finished-wall jobs, review the hours used for cable routing. Your crew may need a higher allowance for those conditions.
Flat-Rate vs. Time-and-Materials Electrical Pricing
For repeatable service work, some electrical contractors use a flat-rate price book. Others charge time and materials, especially when the job involves troubleshooting or an uncertain scope.
A larger installation or renovation often calls for a detailed fixed-price estimate.
| Pricing method | How it works | Common use |
|---|---|---|
| Flat-rate | Agreed price for a defined service | Repeatable service calls |
| Fixed-price estimate | Price based on a defined project scope | Renovations and installations |
| Time and materials | Agreed labor rates plus materials and other charges | Troubleshooting and uncertain-scope work |
A flat-rate price still needs a cost calculation behind it. Check your actual hours and expenses against the price book regularly.
With time-and-materials work, customers may ask for a budget range or a spending limit. Establish the billing terms and authorization process before the work begins.
Common Electrical Estimating Mistakes
Leaving Out Small Materials
Boxes, connectors, staples, bushings, cover plates, and mounting hardware add up.
Use a takeoff checklist, and compare the list with what the crew actually purchased when the job is finished.
Applying New-Work Labor Units to Old Work
Finished walls, insulation, blocking, and limited access slow down cable routing.
Walk the site and adjust the affected labor tasks.
Missing Home Runs
The device count can be correct while the cable quantity is short.
Trace the routes back to the panel and check the conductor quantities against the design.
Forgetting Return Visits
A crew may rough in the job, leave while other trades work, and return for trim.
Include the expected travel, load-in, setup, and testing time.
Using Outdated Material Prices
Check current wire and equipment pricing before the bid goes out. Match the quote validity period to the supplier’s pricing terms.
Counting Expenses Twice
Review loaded labor rates, estimating labor units, and overhead allocations. Know which costs each one covers.
Improve Electrical Estimates With Actual Job Costs
After the job is finished, compare the original takeoff and labor estimate with what the crew used.
Look at actual worker-hours by task, purchased materials, supplier costs, rentals, and other expenses.
Suppose cable routing was estimated at 17 worker-hours but took 25. Check whether the problem was access, a missed home run, unexpected blocking, or an estimating error.
Keep those records with the job. Separate new-work results from old-work results so you can make better comparisons.
Cinderblock’s Build plan includes time tracking and job costing, helping you record labor and job costs against the work. For more detail on comparing estimated and actual expenses, see Construction Job Costing.
Use those actual hours when preparing your next electrical quote.

Andrew Booth
Andrew is a construction industry writer focused on contractor operations, scheduling, estimating, and field workflows.


